Keeping Microsoft Teams Organized
Microsoft Teams is a fantastic application for communicating and collaborating with peers. With Microsoft Teams, you can set up meetings, chat with internal and/or external users, as well as, have audio and/or video calls with these users. Microsoft Teams is a great place to set up and use workspaces for a particular business entity or use case, such as a internal department collaboration, a project, or some other cross-cutting initiative – making it a true hub for your day-to-day collaboration. It’s this last aspect – bringing together all of your workspaces into a single hub – that makes knowing how to keep Microsoft Teams organized very important.
This post will focus on the things end users can do in order to keep Microsoft Teams organized and utilizing its capabilities the way they are meant to be used. As always, your organization should have a proper governance plan in place for your environment that highlights Team owners and their responsibilities, as well as, key policies and processes for everything from file size maximums to spinning up new Teams. CWPS provides some great offerings around governance for your Microsoft Teams, or for your entire modern collaboration environment.
Adding Teams to Groups
One of the easiest things you can do to keep Teams straight is to not spin up more workspaces that you may need. Many users do not realize that if they already have an Office 365 Group, which provides them a SharePoint site, Planner and shared Exchange calendar and inbox, they can easily add Microsoft Teams to this Group without spinning up a brand new Team. The point here is that when you spin up a new Team, you are actually creating a new Group as well – so utilizing that existing Group keeps your environment concise and easier to manage, and also is far less likely to confuse your team members. So how do we do this?
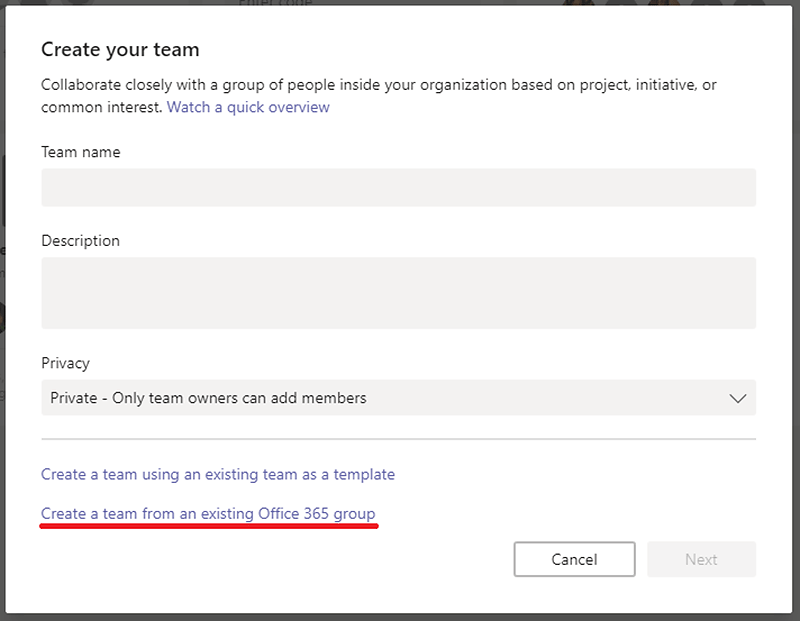
When we spin up a new Team, we click ‘Join or create a team’, then ‘Create a Team’
Figure 1 – Creating a Team
From here, instead of filling in the Team name, description, and setting the Privacy, click the “Create a team from an existing Office 365 Group” link.
Figure 2 – The link at the bottom allows us to add Teams to an existing Group
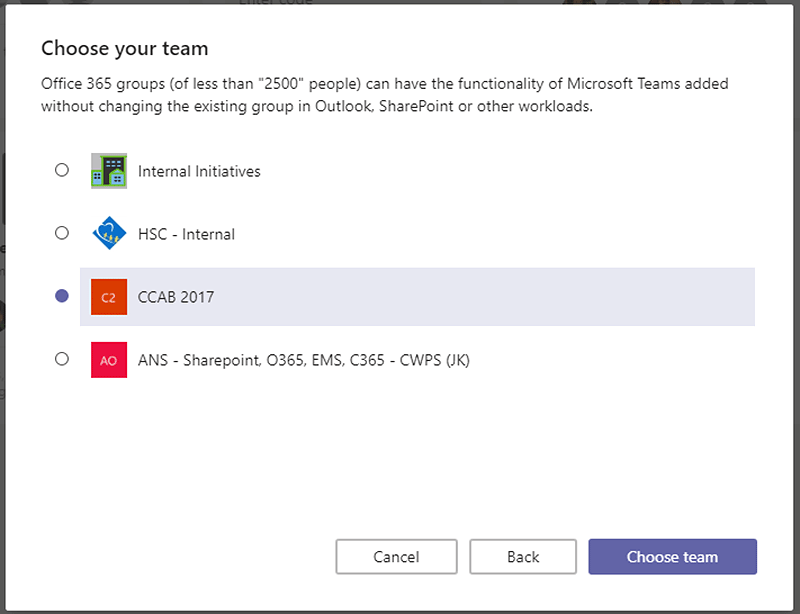
From here, any Groups that you have Ownership of will be displayed, and you can simply select one and then click ‘Choose Team.’
Figure 3 – When adding Teams to a Group, you will only see Groups where you are an owner
The Group is kept, and we simply spin up the Teams framework around it. We now have chat capabilities for our Group!
Utilizing Channels
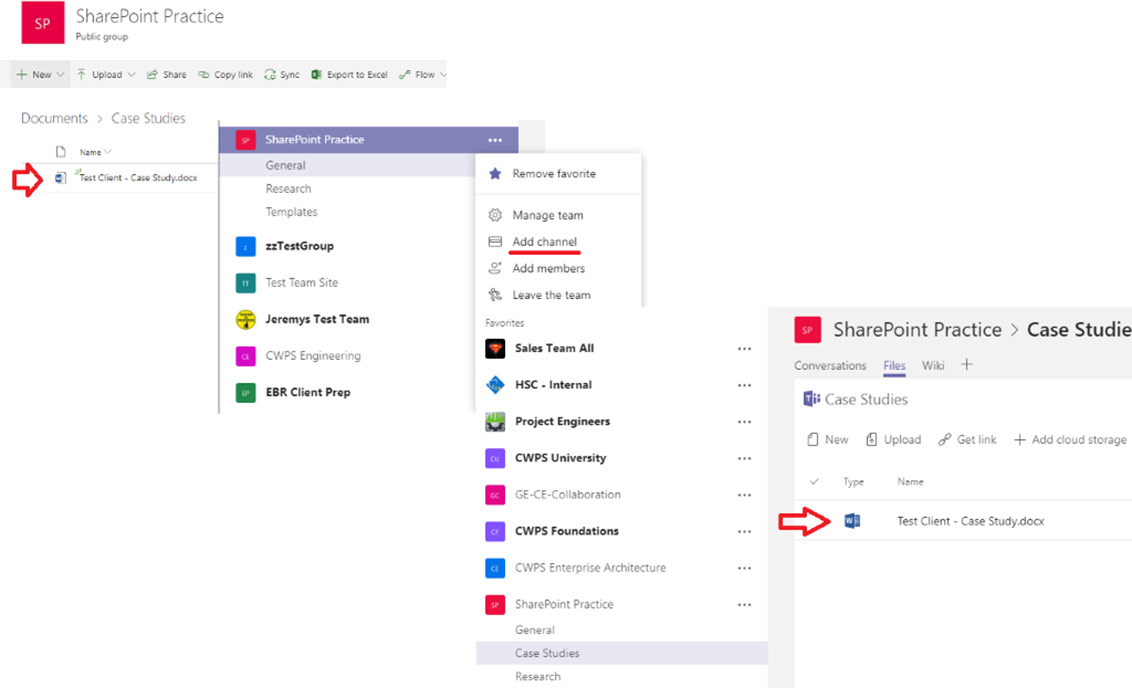
In a previous blog post, we explored how to utilize Channels in order to organize your Teams workspace. There’s an important aspect of this to note given our discussion above about how to add Teams to an existing Group. Primarily, we utilize Channels to segment our chats and our files. However, when we add Teams to a Group if our Group document library already has folders associated with it, those folders don’t automatically show up as Channels in our Team. In order to segment our Team in the same way as our files, and have chat side-by-side with files that are relevant to a particular topic, simply create a Channel with the exact same name as the folder in your Group.
Figure 4 – Adding a Channel with the same name as a Group folder
Once you do this, not only do you get chat for that topic, but the files within that folders show up right beside that chat!
Chat using Threads
One of the slightly confusing aspects of Microsoft Teams are Threads. Each Channel within a team has Chat capabilities, but instead of Chat that is a single thread, each chat is broken into multiple Threads from the same chat pane. The important part here is knowing where to type – if you are responding to a message in a thread, you click “Reply” and post a message to that Thread. If you want to start a new Thread, you utilize the “Start a new conversation” box at the bottom of the chat window.
Figure 5 – Keeping Threads straight will allow you to use Chat for multiple conversations at once
Tabs
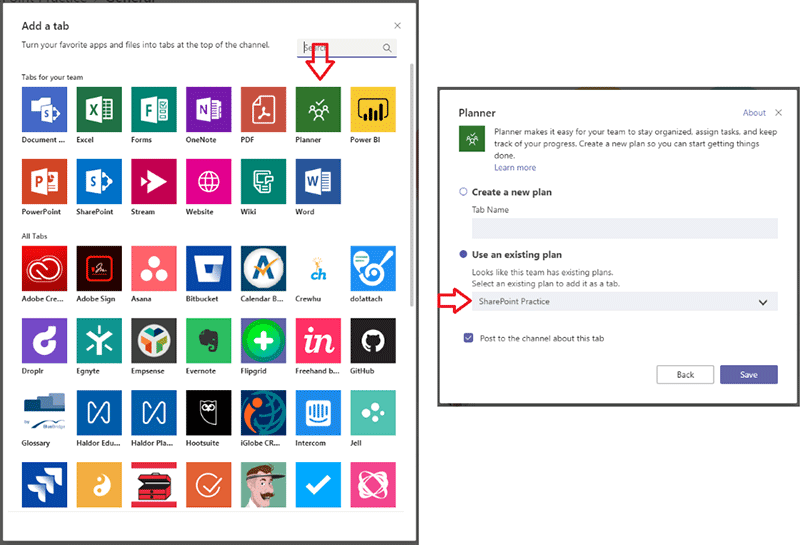
We’ve already discussed some aspects of utilizing Tabs to separate our Chat from our Files, but Tabs in Microsoft Teams are extremely powerful and can pull in all kinds of information and content into your Team Channel. For example, if we were making use of Planner for task management, we can pull that Plan directly into our Teams workspace.
Figure 6 – So many choices. Planner is a popular one
Once we do that, our Tasks for that Group show up right within our Team as a new Tab!
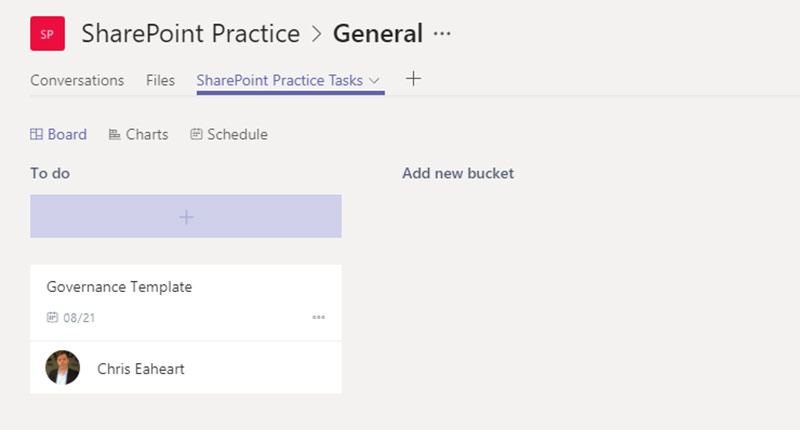
Figure 7 – Pulling Planner tasks directly into my Team keeps me from having to open a browser to edit tasks
Common Settings
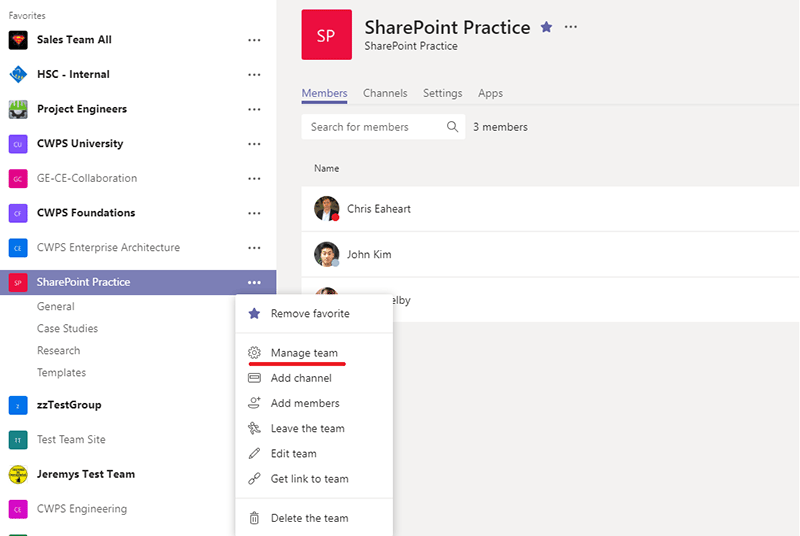
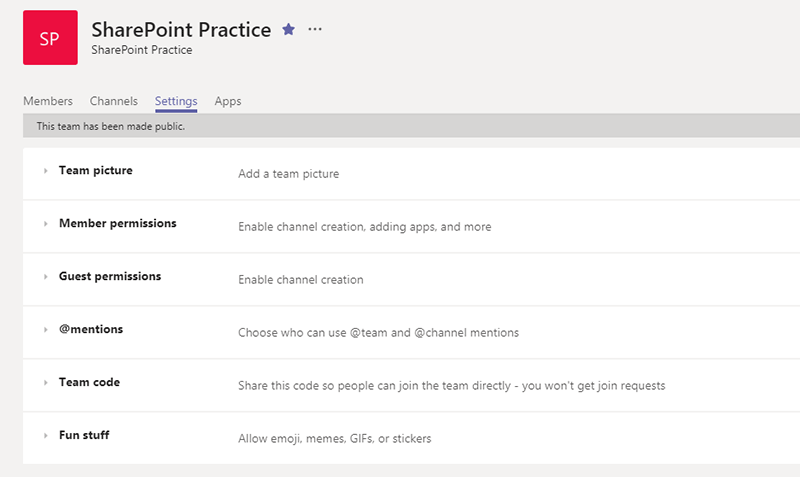
A couple other quick points in terms of organizing your team as it relates to some common settings. Clicking the ellipsis for the Team will provide a few options (if you are an owner), and one of those is “Manage team.”
Clicking this will give you an opportunity to add or remove members, elevate or lower permissions of team members, quickly create channels, as well as, add channels to your favorites or the entire team’s favorites. There are also a host of other settings shown below.
Teams is a great hub for workspaces within Office 365, and truly a world-class application for collaboration for you and your organization. As always, reach out to us in order to continue the conversation!
Are you interested in learning more about Microsoft Teams? Contact Red River today to transition from Skype for Business to the new Microsoft Teams.
written by
Corrin Jones
Corrin Jones is the Director of Digital Demand Generation. With over ten years of experience, she specializes in creating content and executing campaigns to drive growth and revenue. Connect with Corrin on LinkedIn.

